 Introduction:
A Lap Around Texas World Speedway |
Text copyright © 1998 Lone Star Region Porsche Club of America
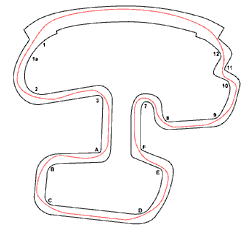
Introduction:There are several different road course configurations at Texas World Speedway (TWS) which are available to Porsche Club events. They all share the front straight and turns 1, 2 3, 9, 10, 11 and 12. We shall discuss only two for this handout, the 1.8 mile infield course and the recently restored 2.8 mile course which exits onto the "old" backcourse outside the confines of the oval.
Since the two courses share the same layout except between the points of exit and re-entry to the infield course, we will discuss the 2.8 mile course first and then discuss the different areas of the 1.8 mile course. Besides distance, you'll find the longer course has more turns, elevation changes not present on the infield and turns that aren't always visible from the point of initial entry, i.e. hidden turns.
Warm brakes stop better than cold ones and warm tires stick better than cold ones, so it is very important that on your warm-up lap(s) that you exercise the brakes to generate some heat. Be aware that as you approach Turn 1, you will have traveled all the way from Turn 10 without using the brakes. This means that the brakes have had plenty of time to cool prior to reaching the heavy braking required for entry to Turn 3. It will take a couple of laps to have enough retained heat in the brakes for maximum effectiveness. The corner workers will display a standing yellow flag to remind you are in the warm-up laps. Remember, no passing under yellow.
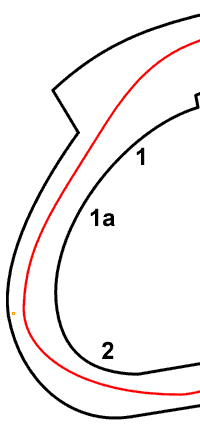 Turns 1 and 1A:
You actually set up for Turn 1 as you cross the start/finish line on the front straight. As you pass the start/finish line you should "climb" the banked straight to be within about a car width of the concrete retaining wall. Any closer to the wall increases the likelihood of encounters with debris which will decrease traction.
You want to make a late entry into Turn 1. A reasonable reference point for your turn-in is a car-length past the point at which the chain fencing on top of the concrete retaining wall ends. As you transition from the banking to the infield, you will compress or "load up" the suspension as you cross from the bank to the apron. Stay on the throttle here and try to be travelling in a straight line to help the car settle as quickly as possible. This entry will give you a long, sweeping corner that is nearly straight. The line will take you about 10 feet out from the inside edge of the pavement. Braking and downshifting are necessary as you approach the entry to Turn 2. Be sure to accomplish these tasks in a straight line.
The outside edge of the track is your turn-in point for Turn 2. It is deceptive as it will seem that you are hell-bound for Houston with no hope of making the turn. However, the track is crowned and you can't actually see the edge of the track or your turn-in point until it seems too late. A NASCAR-type traffic light on the outside oval wall is a good aim point until you can see the painted yellow box at track edge. Start your turn-in just prior to the yellow box for Turn 2.
When you run out of track and have to turn-in you are driving the corner correctly. The obvious tendency is to bailout early resulting in an early apex and an exciting exit from Turn 2. Let the turn-in to Turn 2 scrub off some speed instead of relying entirely on braking. You can drive a lot deeper and carry speed a lot further into this turn than you think. As your experience and courage grow, you will extend your braking point. As you turn into Turn 2, begin to gradually accelerate so as to pass the apex at or near full throttle. This will reduce the steering input required and stabilize the car for a smoother turn and faster exit. Hitting the proper apex point increases the radius of turn and maximizes the speed you can carry in any turn. It is important to place the left tire as closely to the curbing as possible.
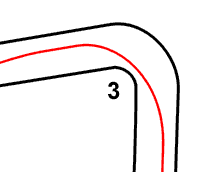 Turn 3:
 As you exit Turn 2 your track-out point will be on the right edge of the pavement. Hold your steering input from Turn 2 through the exit and continue to accelerate (you will most likely need an up-shift here). This will bring you smoothly to the left edge of the pavement in preparation for your turn-in to Turn 3. In this short straight you will encounter your first requirement for heavy braking and also a downshift. This is a mid to slightly early apex turn and you should place your right front tire right at the base of the curbing. Allow the car to exit out to the left-middle side of the track to set up for the straight leading out of the infield and into the back course. Extending your vision up course will help your grasp of the "big picture" and allow the apex point to seem more natural and not just a point on the pavement immediately in front of you. As always, smoothness and consistency are your keys to track success. As you exit Turn 3 and head out towards the oval, the car will get "light" on the suspension as it transitions from the older, gray paving to the newer, black paving. Make sure your steering wheel is straight. You may even hear the tires "chirp" as they lose traction because of the suspension unloading. You will feel like you are airborne, but you are simply experiencing less than 1G force.
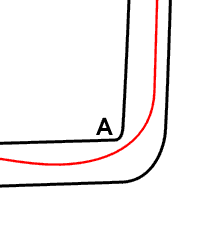 Turn A:
This is a hidden, mid-apex turn. An entry to this right-hander should start a couple of car lengths after passing the oval wall. Hard braking prior to turn-in will be required from the speed picked up in the short straight from Turn 3. The suspension may be a bit unsettled as you pass the oval's retaining wall, over the transition from the oval's back straight. Be cautious for reduced brake effectiveness until the suspension settles. As you turn-in, begin to reapply throttle and use the late apex to exit to about two-thirds of the way out to the left side of the track. As in the track-out at Turn 2, allow the existing steering input to gradually move you back to the right edge of the track for entry into Turn B.
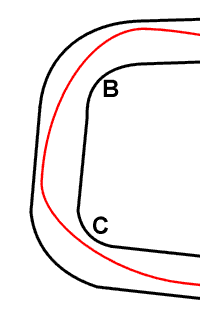 Turn B:
Turn B is deceiving. Normally one would expect to put the car on the inside left edge of the pavement for a proper apex. However, Turn B is actually most important as a setup for the upcoming and critical Turn C. Consequently we want to displace the apex out from the pavement edge. A seam in the pavement about eight feet from the inside edge is a great reference for placement of your left front tire. This displaced apex will move your track-out point more quickly to the far right side of the track. This reduces the amount of rotation the car must experience to properly enter Turn C. Very little or no braking is necessary for entry to Turn B.
Turn C is a moderately fast left-hander that is one of the most challenging turns on the course. The setup is crucial to both a fast and safe journey through Turn C. Turn C is a bit like Turn 2 with less radical braking. You want to be very near the track edge as you make your turn-in to Turn C. The access road coming from the right is a good visual clue for finding the turn-in point. As in Turn 2, scrub speed with the turn-in and place the left front tire at inside track edge at the slightly late apex. An early turn-in here can be exciting as a narrow track-out gives you little room for an early apex mistake. Throttling through the turn is important to aid in completing this turn on pavement.
 Turn D:
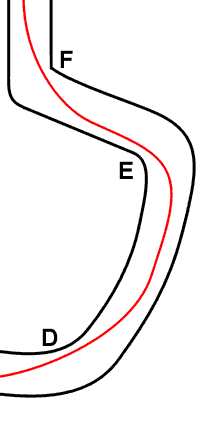
 This turn is the second fastest on the track, behind Turn 1. It is a left-hand, uphill, increasing radius, banked turn (Whew!) The uphill, on-camber nature of the turn allows tremendous speed to be carried into the turn with a slightly early apex maximizing that speed. Therefore the braking for the entry will be minimal to non-existent. It is important to throttle through the turn to maximize traction and take advantage of throttle steering. The left-most pair of high-power poles are a good visual for a track-out line that will set you up on the right side of the track for the entry to Turn E. A reminder here that early apex turns invite extraordinary excitement if a mistake is made in entry. A very early apex combined with high entry speeds can produce significant consequences. Pay close attention to your entry setup and gradually increase your entry speeds as your experience and comfort level increase.
We address these as a sequence because there is virtually no distance from the exit of Turn E to the entry of Turn F. The exit from Turn D sets you up naturally for a proper entry to the Turn E / Turn F sequence. As you crest the hill after the Turn D exit, the track makes a left, downhill turn followed by a quick right, downhill turn which exits the backcourse. Stay right and make a late turn-in for Turn E so that your track-out point places you on the left side of the track. Exit speed is sacrificed for position for entry to Turn F. Early apexing here will place you in the wrong position for your entry to Turn F and will slow your pace dramatically. A two or three car-length straight from track-out, with no braking, precedes your turn-in to Turn F. Turn F is a right-hand turn with a late apex that, when properly executed, will place you at the left side of the short chute straight back across the oval. Armco is up-close and personal on the outside of Turn F and a mistake here can produce profound consequences. Be extra careful not to "pinch" Turn F with an early entry.
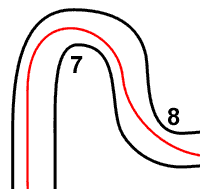 Turn 7 (The "Buttonhook" or The
"Carousel"):
Turn 7 (The "Buttonhook" or The
"Carousel"):Turn 7 is a very late apex, decreasing-radius turn. This is a slow part of the track. Newton will not allow you to revoke his laws of physics and make it fast. Accept it as slow and then work to make it as minimally slow as possible. Some braking is necessary out of the short straight from Turn F, but the nature of the turn will allow you to scrub speed into the entry. Look for the large fuel tank (currently in Exxon colors) at the top of the grandstands as a visual for alignment for turn-in. Enter from track left and begin your turn-in so as to finish immediately adjacent and parallel to the inside curbing as the turn (and the curbing) ends. You shouldn't be more than half-way out from the inside curb at any point from your turn-in. A visible seam in the asphalt paving makes a good reference for the right front wheel in the early part of the turn. A partial lift in the throttle in the later stages of the turn will help rotate the car and reduce the dependence on steering input and front tire grip to make this ever-tightening turn. When the car is properly aligned on exit you will be on the extreme right hand edge, parallel to the track edge and under light to moderate acceleration. Hold your car parallel to the track edge for about one car length prior to turning into Turn 8.
After holding that parallel exit from Turn 7, turn into Turn 8 so as to put your left front wheel right at the edge of the curbing. Turn 8 is a mid-apex turn. Failure to hold that one car-length exit from Turn 7 will force you into an earlier apex than desired and may generate an off-track excursion on track-out from Turn 8. Because of the slow speed of Turn 7, this turn can be executed with lots of throttle. The most typical error is an early turn-in from Turn 7 which forces an early apex that will lead you off track. Work hard to hold that exit from Turn 7 momentarily to set you up for a proper turn-in to Turn 8. You will also need an up-shift somewhere in here. Depending on your car's gearing and power band, this may be approaching turn-in or on track-out. Remember to do your shifting in as straight a line as possible. The track-out for Turn 8 will carry you to the right edge of the track for the short back straight. Stay on the right edge for your entry to Turn 9.
 Turn 9:
Turn 9 is another very fast turn with an increasing radius. On the proper line, with confidence and experience it can be done almost flat-out. It is a mid-apex corner. There is a slight banking of the track at the apex and lots of width to work with for track-out. Another NASCAR-type traffic light on the outside edge of the oval is a good visual reference for a track-out aim point. It is crucial in Turn 9 to maintain positive throttle. A throttle lift here almost guarantees a trip into the unpaved portions of the infield. For beginners it may take a while to get comfortable with accelerating hard through this turn since a small rise in the track hides the true track-out width. Stay near the right edge on track-out to set up for the Turns 10/11/12 sequence.
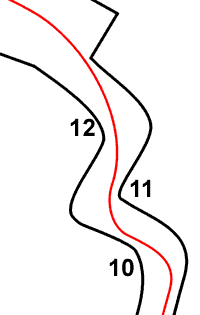 Turns 10, 11 and 12:
This is the most difficult sequence of turns on the track. This sequence is very quick and a mistake will almost assuredly ruin what remains of the sequence. Because this sequence puts you out onto the fastest part of the track, the long front straight, maximum exit speed is especially important here.
Heavy braking as well as a downshift is required from the fast exit of Turn 9 . Enter Turn 10 from about three-fourths of the way toward the right track edge. This is a very late apex turn. You must get your car parallel and nearly on the left side curbing to set up your entry to the much more important Turn 11. Proper execution of Turn 10 in an absolute necessity to get Turn 11 right. The most common mistake here is to try to carry too much speed into Turn 10 which botches the entry to Turn 11 and your ultimate goal of exit speed at Turn 12. Sacrifice a few MPH for this short distance to gain the MPH for your exit onto the front straight.
Hold that parallel position for just a split-second and then turn into Turn 11, placing the right front tire right at the curb's edge. An expansion seam in the track-out curbing at Turn 10 gives a noticeable "thump" and is a good aural clue for the turn-in to Turn 11 (if you're far enough left). From Turn 11, an near-immediate transition to a left-hand turn puts the left front tire on the curb's edge at the slightly early apex of Turn 12. You should be at full throttle at you pass the apex of Turn 12. As you accelerate out of Turn 12, allow the car to track out "naturally" from between mid-track to the right edge. The reduced steering input minimizes the loss of speed from tire scrub. The familiar large fuel tank (currently in Exxon colors) above the grandstands is a good visual reference for track out here also. Attempting to force the car down low (i.e. left) of mid-track will scrub off speed unnecessarily and slow acceleration. Don't worry about having too much speed out of Turn 12 and hitting the wall. The banking on the oval will actually "catch" the car and turn the car left with minimum wheel input. Allow the car to climb the banking on the straight with minimum steering wheel input to prevent scrubbing speed.
Immediately upon entering the front straight, check your mirrors for cars than might want to pass. PCA driver education events require a signal from the car being passed as to which side the passing car should use. Let cars that get up on you in the course by, even if you can blow them away on the front straight drag race. Get physical with the passing signal so everyone can see it. You need a clear and separate signal for each and every car that you want to let by. The front straight is also your best opportunity to evaluate your car. Check your engine gauges to make sure that all is in proper running order. As you approach the start-finish line, look for signaling flags (checker, yellow, etc.). Between start-finish and your entry to Turn 1, check the hot-pit lane for cars that might be entering the track. Check your mirrors, guages and corner workers every time as you enter the front straight.
If you're a beginner, you will find your instructor has a lot to say on the front straight. Since almost anyone can drive fast in a straight line, the instructor will utilize this "quiet time" to elaborate on important points where only sound bites were previously possible. Use the front straight to digest these instructional points and not to impress yourself with top-end, straight-line speed.
Now position your car for another entry to Turn 1 and do it all over again!
P.S.: If you're going to exit into the pits, moderate your acceleration through Turn 11 and Turn 12, but don't allow the car to coast or slow excessively thereby creating a traffic hazard. Keep the car left of mid-track as you exit Turn 12. Be sure to clearly signal with a raised, clenched fist as early as possible to allow those remaining on the track to make their pass at the transition to the front straight.
We'll expound on the Turns 4, 5 and 6 sequence which differentiates this course from the 2.9 mile course. We pickup with Turn 3 which is slightly different due to the set up necessary for the 4,5,6 sequence.
Turn 3 is altered slightly with a bit later turn-in and an exit that keeps the car on the right edge of the track. The car should exit parallel to the track on the far right edge just as the inside radius curbing ends. Hold that position with moderate braking and turn into Turn 4 for a late apex. Again the most common mistake here is an attempt to carry too much speed into Turn 4. Another frequent error here is to either track out at mid-track or simply turn-in early which "pinches" the turn and requires a major correction to make Turn 5. This is another slow part of the track, so don't try to force it into being fast. A proper entry to Turn 4 allows a nearly straight line through Turn 5 and acceleration all the way to the braking point necessary for entry to Turn 6.
With a well executed Turn 4, just a twitch of the steering wheel will get you through the right-hand Turn 5. Exit Turn 5 aimed at the hole in the oval wall where the backcourse re-enters the infield. Track the car out about two-thirds of the way towards the right hand edge to set up for the quick left-hander at Turn 6.
Turn 6 is a late apex turn. For proper entry you will need to lift on the throttle to help rotate the car and, once rotated, to get the left front tire on the curb's edge, add throttle. Exit Turn 6 just to the left of mid-track and then enter Turn 7 as previously discussed. The large fuel tank (currently in Exxon colors) on top of the grandstand area makes a good visual reference for the exit line for Turn 6 and entry line for Turn 7.
| HELPFUL FIRST TIMER TIPS: |
|